Tips / Tricks
Choose the right size hook
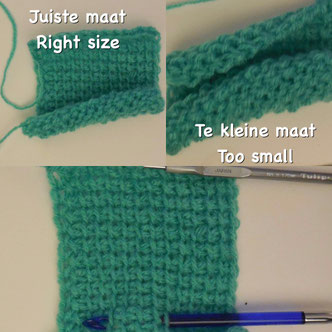
Tunisian crochet has a natural curl. It can be avoided by using the right hooksize. Your hooksize needs to be at least 1-3 sizes larger then the advise on the label of your yarn
Therefore, you always need to make a swatch to determine your hook size.
If your swatch appears too loose or “holey”, go down a hook size. If it is tight and curls about a lot, then go up a hook size.
How to choose multiple colors

This can be used in any project you like and not only with crochet but also in painting or interior decoration.
First of all, you need to choose the primary colour first. Then the next question to decide is how many colours you are going to use.
The next picture will help you a lot to choose your colours. These are the basic rules for using colours. There are a few more, but I try to keep it simple.
First of all, you need to choose your first colour, the one you want to be in your project no matter what. Inside the wheel you see dots that are connected with each other. If you choose those colours, you create an interesting and inspiring colour group.

Wheel nr 1 - only 1 colour
Choose your colour from light to dark. You can include white or black for the first or last colour.
Wheel nr 2 - 2 colours
Choose an opposite colour to create an amazing effect. I used this in my Star blanket to create that amazing look by using an opposite colour.
Wheel nr 3 - 3 colours
Pick the colours from the circle using equilateral triangle (see picture) they skip 3 colours on the circle each time.
Wheel nr 4 - 3 colours
Choose your main colour (red) then go to the opposite side and choose the 2 colours right next to the opposite colour.
Wheel nr 5 - 3 colours
Choose 3 colours right next to each other.
Wheel nr 6 - 4 colours
Choose your colours using a rectangle. The small sides leave 1 colour in between the long sides 3 colours in between.
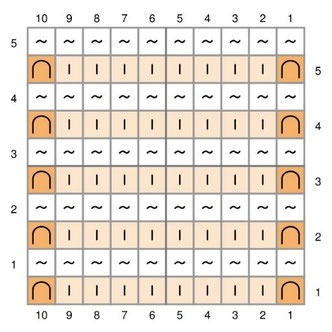
How to Read a Chart
Reading a chart isn’t as hard to do as most think. Below is an example of the Tunisian charts. If you are a knitter, or perhaps have done other Tunisian patterns, the charts may seem familiar to you, but all charts are originally made specifically for this CAL. I am using symbols that are familiar for Tunisian Crochet. I also am using symbols that are used in knitting or a symbol that I created. For example, I made a symbol to show the border/connection loop, because they are so different from the rest. I also like to work with colours on the chart because they read so much faster than symbols.
Explanation of the chart
Every square represents a stitch.
On the top and bottom edges of each chart you will see a row of numbers. Those are the numbers of all the loops on your hook when you have made the Forward Pass. The last number is the total of loops. The first and last loop are your border stitches. The last loop can also be a connection loop used for another block.
The numbers next to the chart are the rows. There is a Forward Pass number on the right, and a Return Pass number on the left.
In this chart the Return Pass are all the same stitches, but later we will do several things in the Return Pass (like cables). Counting rows can be done by counting the V on the right side of your work.
These are the abbreviations used for the stitches. To make it easier I have included a second chart with the abbreviations. This is an example of a pattern with chart.
Abbreviations
BS: Border / Connection loop
TSS: Tunisian Simple Stitch
RS: Return stitch (pull through 2 loops)
Row 1
FP : BS, TSS8, BS
RP : RS10
Row 2
FP : BS, TSS8, BS
RP : RS10
Row 3
FP : BS, TSS8, BS
RP : RS10
Row 4
FP : BS, TSS8, BS
RP : RS10
Row 5
FP : BS, TSS8, BS
RP: RS10